Monday, October 31, 2011

Salsa!


Just like a lot of other Americans I like salsa. The tomato-onion-peppers sauce. The music is all right, but I'm more of a classic rock guy. Like a lot of Americans I also have a garden, in which I grow tomatoes, onions, and peppers. Whoa! I bet you can see where I'm going with this. I found recipes on the web through the extension offices of several different states. I have made salsa before when we had a garden and we liked it very much, so since we have a bunch of tomatoes and the onions are in the basement, I thought I would try another batch of salsa.

This is a canning recipe, so if you are new to it, here are a couple of good places to start looking for information.  

One thing that the recipes tell you to do is peel the peppers by roasting them and then peeling them. I don't do this for a couple of reasons. 1) I'm lazy. 2)It seems like a lot of work for primarily an aesthetic thing. I know, you'll get these little transparent pieces of skin in your teeth occasionally, but I really don't care about that. If you do, then fire-roast your peppers.

Salsa
  • 7 quarts of paste tomatoes (about 11 pounds); peeled, cored, and chopped
  • 4 cups of peppers seeded and chopped (Use the heat that you desire)
  • 5 cups of onion, chopped
  • 1/2 cup jalapeno peppers, cored and diced
  • 6 cloves of garlic, minced
  • 2 cups lemon or lime juice
  • 2 tablespoons of salt (I use pickling salt)
  • 1/2 tablespoon black pepper
  • 2 tablespoons ground cumin
  • 3 tablespoons dried oregano
  • 2 Tablespoons fresh cilantro, finely minced
Wash and peel the tomatoes. Like peaches, you can drop them in boiling water for 30-60 seconds, then dip in cold water and their skins should come off. Wash and prepare onions, peppers, and garlic.  Put all ingredients except cumin, oregano, and cilantro in a large kettle and bring to a boil.

If you used paste tomatoes (like Roma) you probably can get by simmering for about 20 minutes to a half hour. I didn't have enough of those, so my tomatoes were juicier than paste tomatoes. I let it cook down about an hour or so because I hate watery salsa. Add the cumin, oregano, and cilantro for the last 20 minutes or so.


Then, prepare your jars and lids, fire up your water-bath canner (which you should have had warming up for awhile), and put the salsa in jars. Process in boiling water for a time appropriate to your altitude. It's usually 20 minutes where I'm at in Wyoming. Enjoy!

Sunday, October 23, 2011

Butter Crackers


With Samantha and Dona's diets being limited in the types of grains and other things that they can have sometimes they begin to miss some of the foods that many people take for granted. I was casting around for some different kinds of recipes and came across a recipe for homemade crackers. I'm sure many folks would say, "Why would you make your own crackers? The store has boxes and boxes of them!" Well, you're right, but there aren't really many gluten-free options when it comes to crackers like these. Try finding crackers without any flours from grains, and you've either created a huge headache for yourself, or you've found some expensive crackers!

Butter Crackers
  • 1/2 cup (65 grams) tapioca starch (the original recipe does much of this by weight. I'm using volume measures in case you don't have a scale.)
  • 1/2 cup (80 grams)brown rice flour
  • 1/4 cup garbanzo bean flour
  • 1/2 teaspoon sea salt or other coarse salt
  • 1/4 cup cold butter, cut into small pieces
  • 1 Tablespoon Agave Nectar
  • 1/4 cup, plus 1 tablespoon mimiccreme
  • 1 egg yolk beaten with one tablespoon mimicreme
Line a baking sheet/cookie sheet with parchment paper.

Mix the flours and salt together. Add the butter and cut it in using a fork. The mixture should look like coarse flour or corn meal. Add the agave to the mimicreme and stir.

You might need some help for this next step. Start stirring and slowly pour in the cream mixture, pausing to stir and allow the flour to absorb the liquid. Keep stirring and add all of the cream, SLOWLY. The mixture should just come together. It should hold together if you squeeze it into a ball in your hand. Think pie crust. At least that's what it seemed like to me.

Now you can get out your rolling pin and some wax paper or parchment paper. The wax/parchment needs to be about 1 foot square. Take about 1/3 or 1/2 of the dough and flatten it out on one piece of the wax paper. Place another piece of wax/parchment paper on top of the dough and start rolling it out. Roll it to 1/8 inch thickness. If the wax paper wrinkles a bit, you can peel it off and put it back down. Then, flip it over and unwrinkle the other side. 


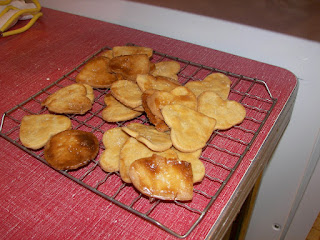
Once you are done, carefully peel back the top layer of wax paper. Using a glass or cookie cutter, cut out rounds and place them on a cookie sheet. Regather your dough, roll it out, and keep cutting until you've used all your dough.


Place the cookie sheet in the freezer for 15 minutes. Preheat your oven to 325 degrees. After 15 minutes, take the cookies out, brush with the egg mixture, and sprinkle each cracker with some salt. Bake 20-25 minutes. If you have more than one baking sheet, make sure you switch the baking sheets and rotate them. Even if you have one baking sheet, you probably should rotate it to avoid any hot spots your oven might have.

Allow your crackers to cool for 5 minutes on the baking sheet and then transfer to a wire rack to cool completely.

Thursday, October 13, 2011

Tomatillo Salsa


This is another post about home canning. See my post on grape jelly for more specific information about some of the process. 

Dona and I signed up for Bountiful Baskets this summer so that we could get more fresh vegetables as well as increase our access to organic vegetables. One of the first baskets we received included a "Mexican bag." I don't remember what other things it included, but I know there were a bunch of tomatillos. I had seen tomatillos before, and I have had tomatillo salsa in the past, but I have never actually tried to make it. Since I had tomatillos, and I didn't know what else to do with them, I decided to try making some salsa. Since I couldn't find any recipes somewhere else, I used one from the food network.

Tomatillo Salsa
  • 1 Large poblano pepper, seeded and chopped
  • 1/2 onion, cut into wedges 
  • 4 cloves garlic
  • 2 1/4 pounds tomatillos,
  • 1/2 teaspoon cumin
  • 1/4 cup lime juice
  • 1 tablespoon white vinegar
  • kosher salt
  • 3 jalapeno peppers
 Husk the tomatillos and cut into quarters. Put them in a blender or food processor and chop them coarsely. Transfer them to a bowl.  


Coarsely chop the pepper and onion. You can do this by hand or with a machine. Put them in a large saucepan or kettle. Add the cumin, lime juice, vinegar, sugar, and 1 tablespoon of salt. Bring to a boil and and allow to reduce slightly. 


Add the tomatillos and jalapenos, cover, and return to a boil.


Once heated,  it will look like this. 


Fill your jars with the mixture, leaving 3/4 inch headspace, seal and process in a boiling water bath canner for the amount of time appropriate for your altitude.

Sunday, October 9, 2011

Pierogis


While my ethnic background is Norwegian,  I enjoy and like to try other ethnic food. Unfortunately, much of the ethnic food from other European countries tends to be made of wheat flour. When I had to quit using grains I started looking around for recipes withe alternative flours, like garbanzo bean flour.  I was looking for something else but accidentally happened upon this recipe for pierogis. The author of the recipe had some limitations that I don't have to address, but it's a good basis for a recipe. 

Pierogis
  • 2 cups gluten-free flour (I use one cup each of garbanzo bean flour and tapioca flour)
  • 2 teaspoons xanthan gum
  • 4 eggs
  • 2 tablespoons butter
  • 1/3 cup milk (you could use rice milk, soy milk, or nut milk)
  • pinch of salt
Mix the dry ingredients together. Add the butter in chunks and cut in with a pastry knife or a fork so that the mixture is like coarse corn meal. Add the eggs and milk and mix until the dough forms a ball. 


Meat Filling
  • 1 pound hamburger, browned and drained
  • 1/2 medium onion (1/2-2/3 cup)
  • 1 stalk celery
Leave a little of the grease from the meat in the pan and saute the onion and celery. Put the meat back in and allow it to warm up. Drain again. 


Making the Pierogis

To roll out the dough, put some dough in between two sheets of plastic wrap that have been sprayed with no-stick spray. Roll out the dough to a quarter-inch. cut out two inch circles and roll the circles to a thickness of one-eighth inch. Put 2-3 teaspoons of meat mixture in the center of the circle. Moisten the edge of the dough with water and fold over. 


The nice thing is that with the plastic wrap on the bottom, you can fold it over and crimp it without it sticking dough to your fingers. 


Once you have a batch made, boil water in a medium or large kettle. Boil the pierogis for 8-10 minutes. Remove from the water, and allow them to cool and dry on a towel. Once cool, you can freeze them. 


The pierogis look different after you boil them. They sure taste good, though! Simply fry them in a tablespoon of butter or oil.


Wednesday, October 5, 2011

Sugar-Free Strawberry Jam


On Sunday I talked about grape jelly. Today it's strawberry jam.

Strawberry Jam
  • 8-10 cups strawberries, washed and hulled
  • 1-2 boxes low sugar pectin (Sure Jell, Ball, MCP, or whatever is available in your area)
  • 1-2 cans apple juice or white grape juice concentrate (100% juice) 
Once your berries are ready, put them in the blender. Depending on how big your blender is, you might have to do it in a couple of batches. Don't puree them, you just want to break them down into small pieces. Of course, this also depends on how you like your strawberry jam. If you like it chunky, just pulse your food processor or blender a couple of times. to get the juice flowing and break up the strawberries.

Once you have this done, put the strawberries in a large stainless steel kettle with 1 box pectin, and bring to a rolling boil. (See the post on Grape Jelly, immediately preceding this one, for other information about home canning.) Add one can of concentrate, return to a boil, and boil for one minute.  Now, taste your concoction to see if it's sweet enough for you. If not, add another can of juice and boil for another minute.

 Once you have it sweet enough, we need to see if the jam will "jell." I wrote about the spoon test last time, but I will repeat it here. Dip a spoon in the jam and place it in the freezer for a minute. (Put it on a plate so that you don't get stuff in the freezer sticky.) Take the spoon out and see how the jam slides off. If it slides off in a sheet, it's ready. I usually just tasted it to see if it was about the right consistency. If it's too soupy, add another half of a box of pectin, boil for another minute, and repeat the spoon test. Once it's the right consistency, you are ready to put it in jars, put the jars in the water bath, and boil away!

*When I made this, I used apple juice concentrate. However, pectin also is made from apple juice, so they might have worked together, because I had a hard time getting it as sweet as I wanted it. Next time, I am going to try white grape juice.

Sunday, October 2, 2011

Grape Jelly


If you have followed this blog at all, you know that Samantha and Dona (daughter and wife) are trying to avoid sugar. As I'm sure you can imagine, a person can have a difficult time trying to find things like condiments that don't contain sugar. We found some jams and jellies that don't use refined sugar, for $6-$8 per jar. So I thought I would see if I could make some that was edible. I will post a strawberry jam recipe here this week that was all right, if a bit tart. This grape jelly, though, is pretty good.

If you have never before done any home canning, I would encourage you to start small and start easy. Hit some yard sales and buy a water bath canner from an old lady who doesn't need it any more. She will probably supply you with some mason jars as well. Jams and jellies are some of the classic things to preserve, as well as things like apple butter.

I found this recipe for jam without sugar. As I noted above, it turned out pretty well.

Grape Jelly
  • 2 containers of frozen grape juice concentrate, thawed
  • 1-2 boxes of low-sugar pectin 
Put one of the containers of grape juice concentrate in a stainless steel or enamel kettle with 1 box of pectin and bring to a rolling boil (one that cannot be stirred away). Add the rest of the grape juice concentrate, return to a rolling boil, and boil for one minute. 

Now you need to test to see if your jelly will "jell." Dip a spoon in the jelly and put it in the freezer for about a minute. 


Take the spoon out and see if the jelly runs, drips, or slides off. If it slides off, you are ready to put your jelly into jars. If not, you need to add more pectin. Add about a half of a box, and boil hard for another minute. Do the spoon test again. It should jell now, but you might need to add another 1/4 to half of a box of pectin. Once your jelly jells, then you are ready to put it into jars. 


I assume you have washed your jars. Once you have the jelly warming up to a boil the first time, put them in a sink of really hot water. You are going to be putting boiling hot liquid in the jars, and the glass might crack if it's not warmed up.  


Also, before you even start the process, put enough water in your canner and turn on the heat to medium or medium-high. Start with hot water out of the faucet if you can, because it will take awhile and a lot of heat to get the 3-5 gallons of water boiling hard. 


Anyway, put your jelly in jars and put lids and rings on the jars. Boil for the amount of time appropriate to the size of jars you are using and your altitude. 


When you are done you have some homemade grape jelly!